
This post appeared originally in our sysadvent series and has been moved here following the discontinuation of the sysadvent microsite
Our company has embraced our local GitLab installation extensively. At its core, GitLab provides a repository management system based on the Git versioning system. A very practical extension to GitLab is the GitLab CI feature.
In short, the GitLab CI is a set of commands that can be run when a
repository receives a push, when an API is called, or when it is triggered
by someone through the GUI. The commands are specified in a given YAML
formatted configuration file - .gitlab-cy.yml which contains a set of
specific keywords and arguments.
The software that performs the actual commands - a GitLab Runner - is written in go and can be installed as a standalone script on one or more separate servers. A Runner can be set up as shared or specific, all according to your preference.
Jekyll
As noted in an earlier blog-entry, our techblog and this sysadvent calendar uses the Jekyll software to produce a static site from markdown content. This content, together with custom templates are stored in Git repositories in our private GitLab server.
At this point it should be noted that GitHub Pages not only supports Jekyll, but also lets you configure custom domains. So why not just use GitHub Pages? In our case, we are a corporation and would like these pages to be served from main our corporate address (hello SEO). More importantly, the Jekyll software is easy to set up and use, and as such serves as a good example of the GitLab CI workflow.
GitLab CI
In our case, we would like to do the following steps after one of our employees pushes changes to the Jekyll Git repository:
- Build the static site
- Perform some consistency checks on the result
- Publish the site
We do start out by declaring the 3 stages in the top of our gitlab-ci.yml file:
---
stages:
  - build
  - test
  - deploy
Build stage
In this stage, we would like to build the website with the Jekyll software. A GitLab Runner can start a new docker container and check out the git repository inside the container for us:
image: containers.redpill-linpro.com/ci-images/ruby:2.3
build site:
  stage: build
  script:
    - bundle install --path=vendor
    - bundle exec jekyll build
    - mv _site sysadvent
  artifacts:
    expire_in: 1 month
    paths:
      - sysadvent
Here, the image keyword defines which docker container we should run. This
container can be self-hosted as all GitLab repositories also includes
a docker registry.
The build site keyword defines a stage block, and the “stage” keyword
defines which stage this is.
The script keyword defines a shell script that the Runner should run in
this stage. In this case, the script installs Jekyll, instructs Jekyll
to build the site, and renames the resulting _site directory to
something more natural.
Finally the artifacts keyword tells the Runner that we want to save
the result defined in the paths keyword. The Runner will return this
result as a compressed volume and store it in the GitLab
repository. The expire_in keyword sets an expiry date for the
artifacts. This is a useful variable to set as default expiration is never.
Test stage
In this stage, we want to test the result of the previous build:
---
test site:
  image: containers.redpill-linpro.com/ci-images/linkchecker:latest
  stage: test
  script:
    - webfsd -p 4000 -f index.html
    - http GET http://localhost:4000/sysadvent/varnish-probe | grep OK
    - linkchecker http://localhost:4000/sysadvent/
This stage is set up to run in a separate, specific docker
instance specified through the image keyword. The previous
artifacts step ensures that the build created in the previous step
is imported into this container and unpacked in a “sysadvent”
directory.
The main takeaway from this stage is the script. Here, we set up a local web server serving the newly unpacked sysadvent site on port 4000 (Jekyll also includes a web server, but the original author took a shortcut by not installing the Jekyll software in the container in this stage). The script then performs two separate, simple consistency checks on the site.
The first consistency check is checking for the varnish-probe
file. This file is used as a health check for our varnish
frontends and failing to deploy this file would result in the production
frontend varnish instances considering this backend as down. The second
check checks link consistency through the linkchecker tool. If any of the script
lines returns a non-zero result, the Runner and GitLab CI will stop the
CI process at that point and display a corresponding error in the GitLab GUI.
These checks can of course be complemented with more complex testing.
Deploy stage
At this point we have built the site and tested it. Now we need to deploy it:
---
deploy:
  stage: deploy
  environment: production
  script:
    - export LC_ALL=C.UTF-8
    - export LANG=C.UTF-8
    - s3cmd --no-mime-magic --access_key=$ACCESS_KEY --secret_key=$SECRET_KEY --acl-public --delete-removed --delete-after --no-ssl --host=$s3host --host-bucket='%(bucket)s.$s3host' sync sysadvent s3://rl_web.sysadvent.prod
In this case, we are publishing the site to a local s3 compliant site redundant Ceph cluster. In order to do that, we need to authenticate the publishing process. So how do we store secrets safely in what is essentially a public Git repository?
Enter the GitLab concept of Secret Variables. This is located in the project configuration settings, and any key/value pairs entered here are not stored in the actual Git repository.
As shown, these variables can be accessed as environment
variables in any script-blocks in the .gitlab-ci.yml file.
Runners
In order to get these steps up and running, we need to configure one or more of Runners to do the actual work. Installing and configuring a runner is documented in the GitLab docs.
After a Runner is configured it should be possible to choose it in the
GitLab project configuration menu. In our case, we have used a specific
runner that serves only our needs. You can also set up several Runners with
different configurations and control which Runner does which step
through the tags keyword. A Runner will then only pick up a job that
has a corresponding tag.
The result
GitLab will show a graphical representation of the CI process under the Pipelines heading:

In the figure, we can see a check-in triggering three stages. Also present are buttons to trigger the pipeline again. Pressing initial status button allows you to drill down into a more detailed view of the pipeline, eventually ending in logs from individual stages:
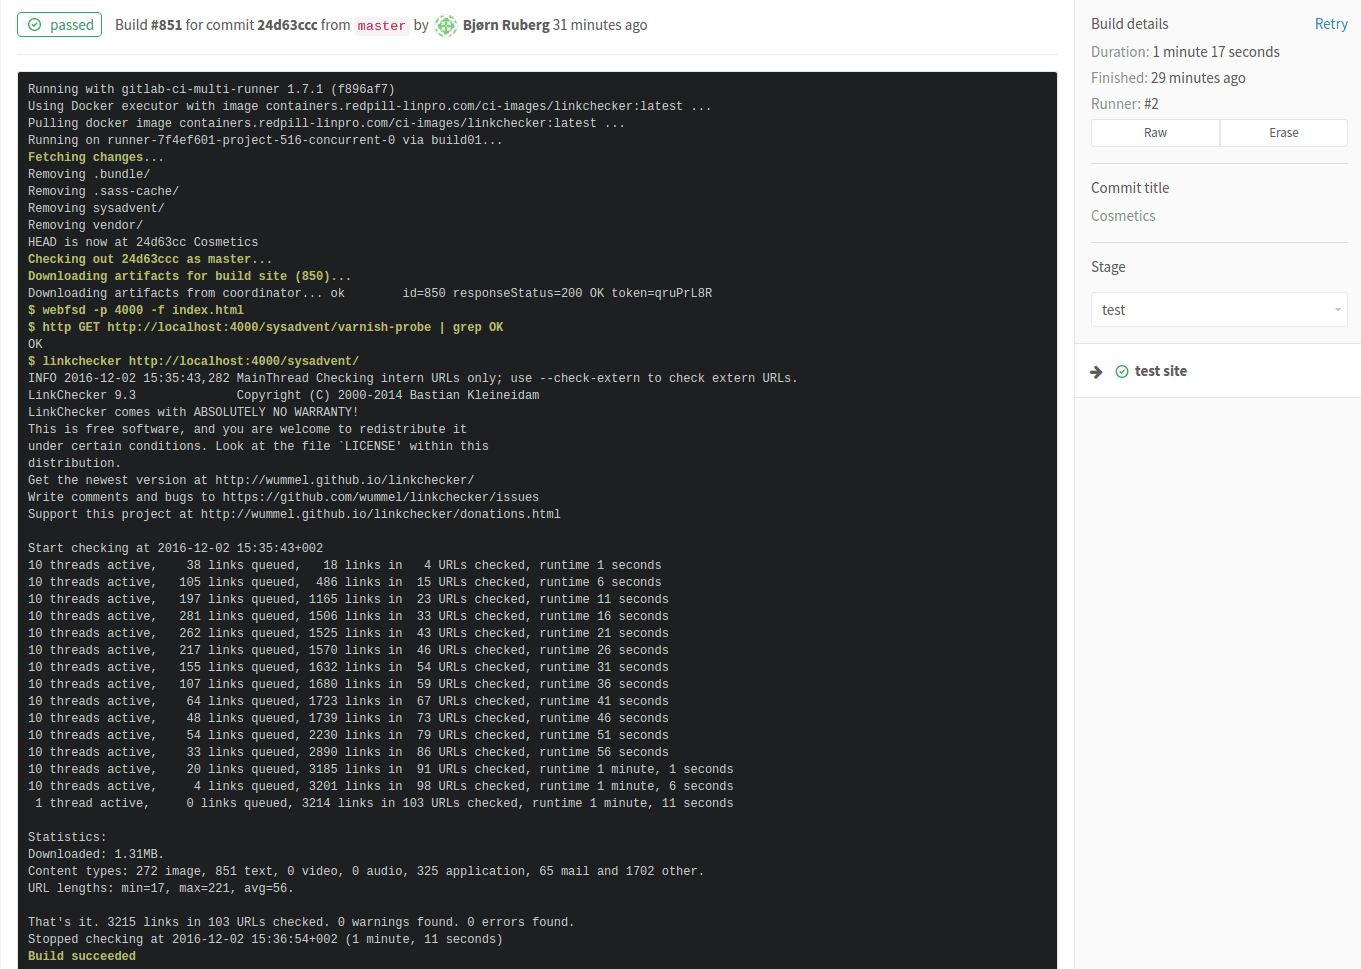
If an artifact is built in this stage, the artifact is shown on the right hand side.
Updates
- 2024-01-29 Fixed link to GitLab runner documentation.
- 2025-11-25 Updated dead link to GitLab CICD
.gitlab-ci.ymlyaml documentation.
EL9's grubby sorting
So I had this el9 machine that had been sitting quietly waiting for updates for a bit too long. Blinded by courage, I went in and did a
dnf update, rebooted, and lo and behold, it worked without a hitch afterwards. Except just one small one: It did not automatically boot the newest kernel. I tried the standard things. Look at /etc/default/grub, look at the output of various grubby commands. To no avail. It simply would ... [continue reading]