Why Btrfs?
Btrfs is full of new features to take advantage of, such as copy-on-write, storage pools, checksums, support for 16 exabyte file-systems, online grow and shrink, and space-efficient live snapshots. So, if you are used to mange storage with LVM and RAID, Btrfs can replace these technologies.
The best way to get familiar with something is to start using it. This post will detail some experiences from installing a laptop with Debian Jessie with Btrfs and swap on encrypted volumes.
The old way
Before switching to Btrfs one could typically put /boot on the first primary
partition and designate the next partition to an encrypted volume, which in
turn was used for LVM that we would chuck everything else into. For a road
warrior with potential sensitive data on disk, full disk encryption is a good
thing, and as the LUKS encryption is at the partition level one only has to
punch in the pass phrase once during boot.
The Btrfs way
When implementing Btrfs one would like to avoid LVM and entry of pass phrases
multiple times. Achieving this with separate encrypted partitions designated for
/boot, swap and Btrfs triggers subtle changes in the partitioning and the
tools involved during boot.
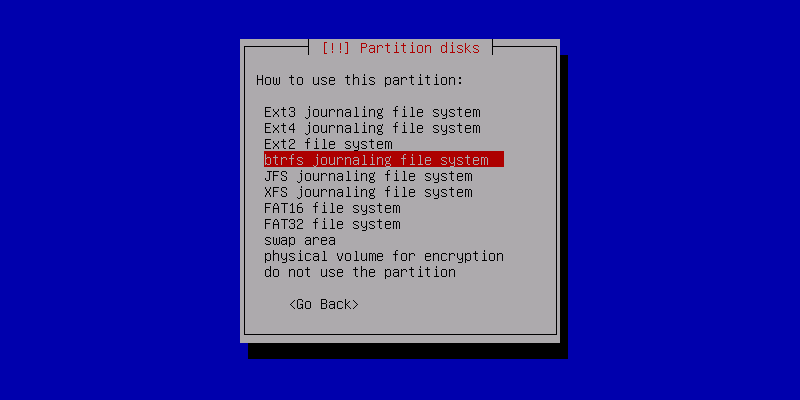
One way is to partition with /boot on the first primary, then two encrypted
volumes – one for swap and one for / with Btrfs, and during initialization
of the encrypted volumes make use of the same passphrase for both of the
encrypted volumes.
Post booting into your newly installed system:
apt-get install keyutils
and add the keyscript=decrypt_keyctl option to both of the encrypted volumes
listed in /etc/crypttab. Then issue:
update-initramfs -u -k all
to update your initramfs to include keyutils. Then reboot and check that the entered passphrase is cached and used to unlock both of the encrypted volumes.
Then what?
Many Linux distributions will install to the default sub-volume. This may be
undesirable as snapshots and sub-volumes will be created inside the root
file-system. A possibly better layout would be to have a snapshots
directory and a rootfs sub-volume for the root file-system.
So, we’ll create the layout for the new default sub-volume:
btrfs subvolume snapshot / /rootfs
mkdir /snapshots
As the contents under /rootfs will become the new root file-system, do not
make any changes to the current root file-system until you have rebooted.
Edit /rootfs/etc/fstab so that the new rootfs sub-volume will be used on
subsequent reboots. I.e. you will need to include subvol=rootfs under
options, à la:
# <file system>        <mount point>  <type>  <options>               <dump>  <pass>
/dev/mapper/sdXX_crypt /              btrfs   defaults,subvol=rootfs  0       1
In order to boot into the right sub-volume one needs to set the default
sub-volume to be rootfs. E.g. find the sub volume’s ID with:
$ btrfs subvolume list /
ID 262 gen 704 top level 5 path rootfs
and set it as default with:
btrfs subvolume set-default 262 /
Then restart to boot into your rootfs sub-volume. Note that a measure of success
is that the /snapshots folder should be missing. Now, delete the contents
of the old root in the default sub-volume.
To facilitate creation of new sub-volumes/snapshots, make a mount point for the default sub-volume:
mkdir -p /mnt/btrfs/root/
and add it to /etc/fstab:
# <file system>        <mount point>     <type>  <options>                     <dump>  <pass>
/dev/mapper/sda6_crypt /mnt/btrfs/root/  btrfs   defaults,noauto,subvolid=5    0       1
Then one can easily mount /mnt/btrfs/root/ and create snapshots/sub-volumes. Yay!
Suggestions for further reading
“Stuff” that helped me in getting acquainted with Btrfs:
- Kernel.org’s Btrfs Sysadmin Guide and the articles, presentations and podcasts they have linked in.
- Linux.com’s articles, part one and two, on Btrfs Storage Pools, Sub-volumes And Snapshots.
Update
- 2024-08-26: Updated dead link to StackExchange.