The 12-factor app presents a number of guidelines to achieve DevOps compliancy. One of the guidelines specifies dev/prod parity, which in OpenShift can be implemented by re-using a single container image for all steps within an applications life cycle. Here we will describe how dev/prod parity can be achieved within OpenShift by using the pipeline support of the OpenShift BuildConfig object type.
Dev/prod parity within the 12-factor app
The twelve-factor app is designed for continuous deployment by keeping the gap between development and production small.
Using this principle, the elements of an application that change within the different stages of the application become minimal, or even nonexistent. This is in contrast to a development workflow where an application is run on:
- the developers workstations
- a test machine
- a production environment
All of the above are usually maintained separately and even when there is a single responsibility for maintaining test and production, there usually will be differences between those environments. Even when using tools like Ansible and puppet for trying to guarantee idempotency.
The actual versions of libraries and binaries might, however slightly, not be identical. This can lead to hour-long sessions of comparing environments to identify the reason a bug is showing up in one environment but not in the other(s).
So would it not be great to eliminate this challenge by using the same container image throughout the complete development cycle?
Enter OpenShift CI/CD with Jenkins pipelines.
Prerequisites
We are assuming you have access to a working Origin Kubernetes Distribution or OpenShift Container Platform installation. Make sure you are logged in:
oc login
We also assume you have access to a (publicly) available Git repository containing the source-code for your project. In this post we use the application available at https://github.com/pjoomen/hellopythonapp.
This is just the source-code for the application and not the Dockerfile used for building the application. We rely on Source-To-Image for building the container image. Note that public access is not an absolute requirement, but that configuration of credentials is out-of-scope for this post.
Creating the projects
We start with the creation of three projects, one for each of the stages of the development workflow:
oc new-project production
oc new-project testing
oc new-project development
Inter-project permissions
To allow the production and testing environment to access the image from the registry in the development project, we need to add the image-puller role to service accounts from those projects:
$ oc policy add-role-to-group system:image-puller system:serviceaccounts:production
role "system:image-puller" added: "system:serviceaccounts:production"
$ oc policy add-role-to-group system:image-puller system:serviceaccounts:testing
role "system:image-puller" added: "system:serviceaccounts:testing"
Populating development
We are now ready to populate the projects with our sample application. We start out with development:
oc new-app https://github.com/pjoomen/hellopythonapp.git
This will build the image using Source-To-Image, and creates a DeploymentConfig and a Service. After the application is available, expose it to the world and test its functionality:
$ oc status
...
svc/hellopythonapp - 172.30.72.143:8080
  dc/hellopythonapp deploys istag/hellopythonapp:latest <-
    bc/hellopythonapp source builds https://github.com/pjoomen/hellopythonapp.git on openshift/python:3.6
    deployment #1 deployed 35 seconds ago - 1 pod
...
$ oc expose svc hellopythonapp
route "hellopythonapp" exposed
$ curl $(oc get route hellopythonapp --template '{{.spec.host}}')
Hello Python World!
Populating testing & production
We now want to reuse the same container image within the testing and
production projects. This can be achieved by creating an ImageStreamTag
within those projects and then using the new-app verb to create the
application:
$ oc project testing
Now using project "testing" ...
$ oc tag development/hellopythonapp:latest hellopythonapp:test
Tag hellopythonapp:test set to development/hellopythonapp@sha256:65e18883d9d6bf76c767e9abe572c3b3779d6aad6bee80148bfda4342e0ab0e8.
$ oc new-app --image-stream=hellopythonapp:test
--> Found image 2409f5b (5 minutes old) in image stream "testing/hellopythonapp" under tag "test" for "hellopythonapp:test"
...
--> Creating resources ...
    deploymentconfig.apps.openshift.io "hellopythonapp" created
    service "hellopythonapp" created
--> Success
    Application is not exposed. You can expose services to the outside world by executing one or more of the commands below:
     'oc expose svc/hellopythonapp'
    Run 'oc status' to view your app.
$ oc status
...
svc/hellopythonapp - 172.30.54.10:8080
  dc/hellopythonapp deploys istag/hellopythonapp:test
    deployment #1 deployed 36 seconds ago - 1 pod
...
$ oc expose svc/hellopythonapp
route "hellopythonapp" exposed
$ curl $(oc get route hellopythonapp --template '{{.spec.host}}')
Hello Python World!
Note that by creating the application like this, a rolling roll-out is performed as soon as the ImageStreamTag object is updated.
Repeat this same procedure for the production project, using the tag prod. This is left as an exercise for the reader.
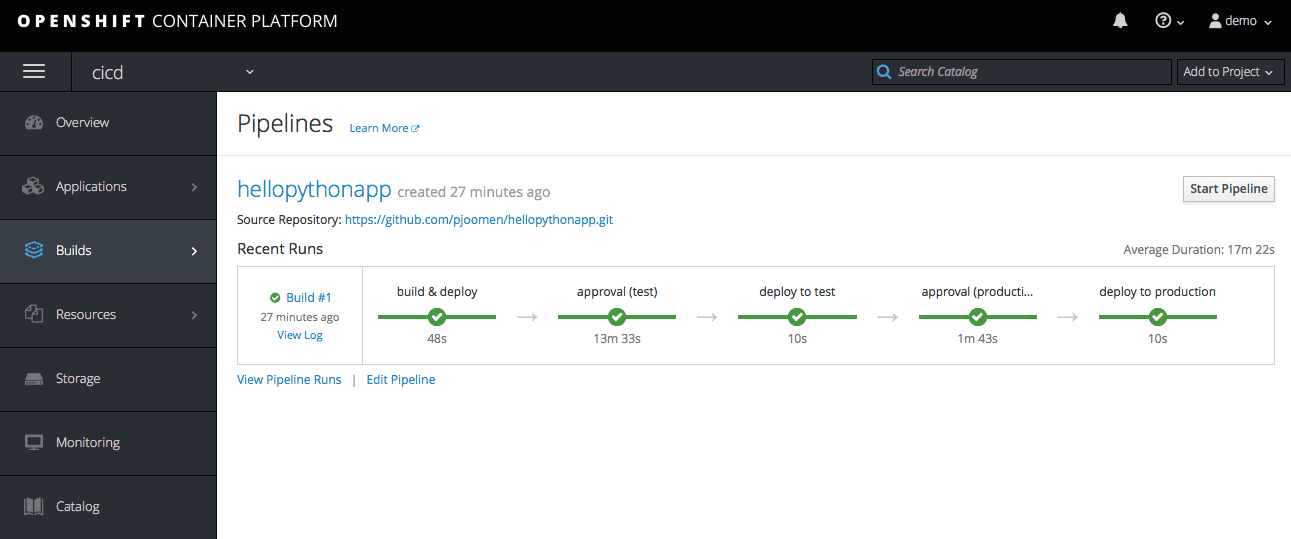
Designing the pipeline
Now that the bits & pieces are in place it is time to get a Jenkins instance up and running to be able to run new deployments from its pipeline. The pipeline consists of five stages:
- build & deploy
- approval (test)
- deploy to test
- approval (production)
- deploy to production
build & deploy
stage('build & deploy') {
  openshiftBuild bldCfg: 'hellopythonapp',
    namespace: 'development',
    showBuildLogs: 'true'
  openshiftVerifyDeployment depCfg: 'hellopythonapp',
    namespace: 'development'
}
This stage builds the container image using Source-To-Image and deploys the result within the development project.
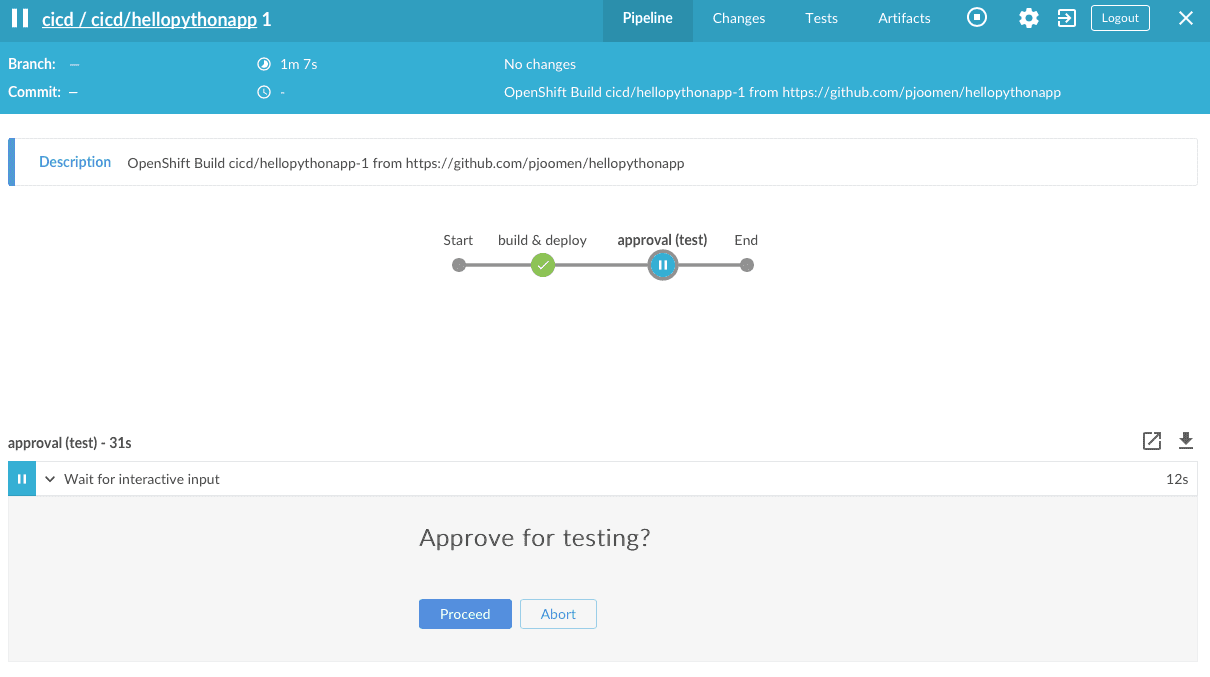
approval (test)
stage('approval (test)') {
  input message: 'Approve for testing?',
    id: 'approval'
}
This stage is just an interactive prompt to get approval for proceeding to the next stage, after verification of correct operation of the application within the development project. Usually this is combined with unit tests to make sure no faulty code is slipping through.
deploy to test
stage('deploy to test') {
  openshiftTag srcStream: 'hellopythonapp',
    namespace: 'development',
    srcTag: 'latest',
    destinationNamespace: 'testing',
    destStream: 'hellopythonapp',
    destTag: 'test'
  openshiftVerifyDeployment depCfg: 'hellopythonapp',
    namespace: 'testing'
}
The actual deployment to the testing project is performed by moving the ImageStreamTag to the updated version of the container image, which will automatically start a new deployment.
approval (production)
stage('approval (production)') {
  input message: 'Approve for production?',
    id: 'approval'
}
This stage is similar to stage 2, but this would usually be combined with integration tests against the testing environment.
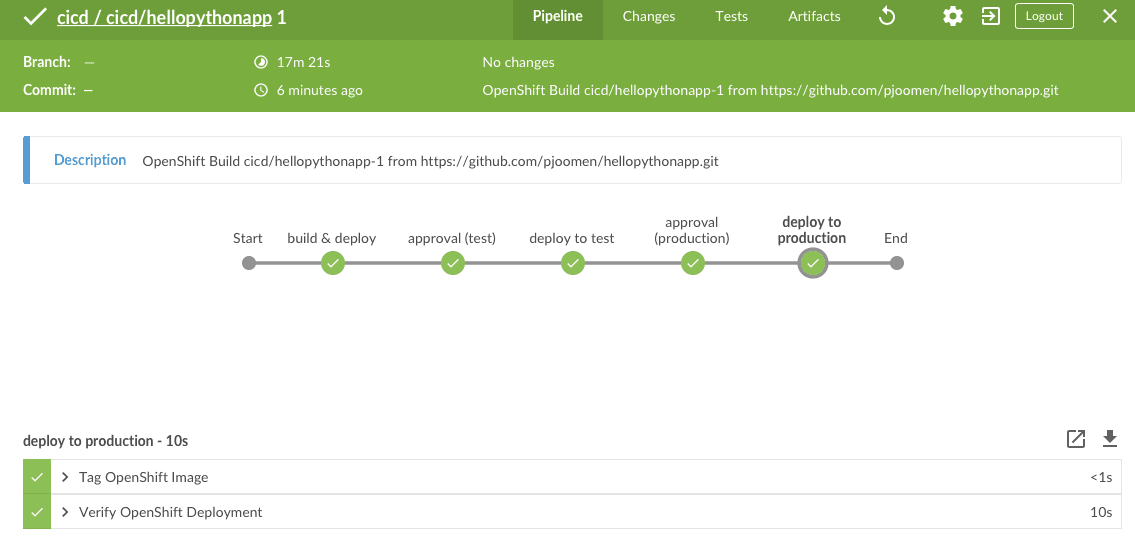
deploy to production
stage('deploy to production') {
  openshiftTag srcStream: 'hellopythonapp',
    namespace: 'development',
    srcTag: 'latest',
    destinationNamespace: 'production',
    destStream: 'hellopythonapp',
    destTag: 'prod'
  openshiftVerifyDeployment depCfg: 'hellopythonapp',
    namespace: 'production'
}
Similar to stage 3, but now running against the production project.
The above components are put into a code repository and this repository can be used to start an internal Jenkins instance which is used to perform the development workflow. The end result of this pipeline design can be seen here.
Starting Jenkins
We will use a dedicated project for running Jenkins:
oc new-project cicd
To allow Jenkins to run against the different projects, we need to allow it edit access to those projects:
$ oc -n development policy add-role-to-user edit system:serviceaccount:cicd:jenkins
role "edit" added: "system:serviceaccount:cicd:jenkins"
$ oc -n testing policy add-role-to-user edit system:serviceaccount:cicd:jenkins
role "edit" added: "system:serviceaccount:cicd:jenkins"
$ oc -n production policy add-role-to-user edit system:serviceaccount:cicd:jenkins
role "edit" added: "system:serviceaccount:cicd:jenkins"
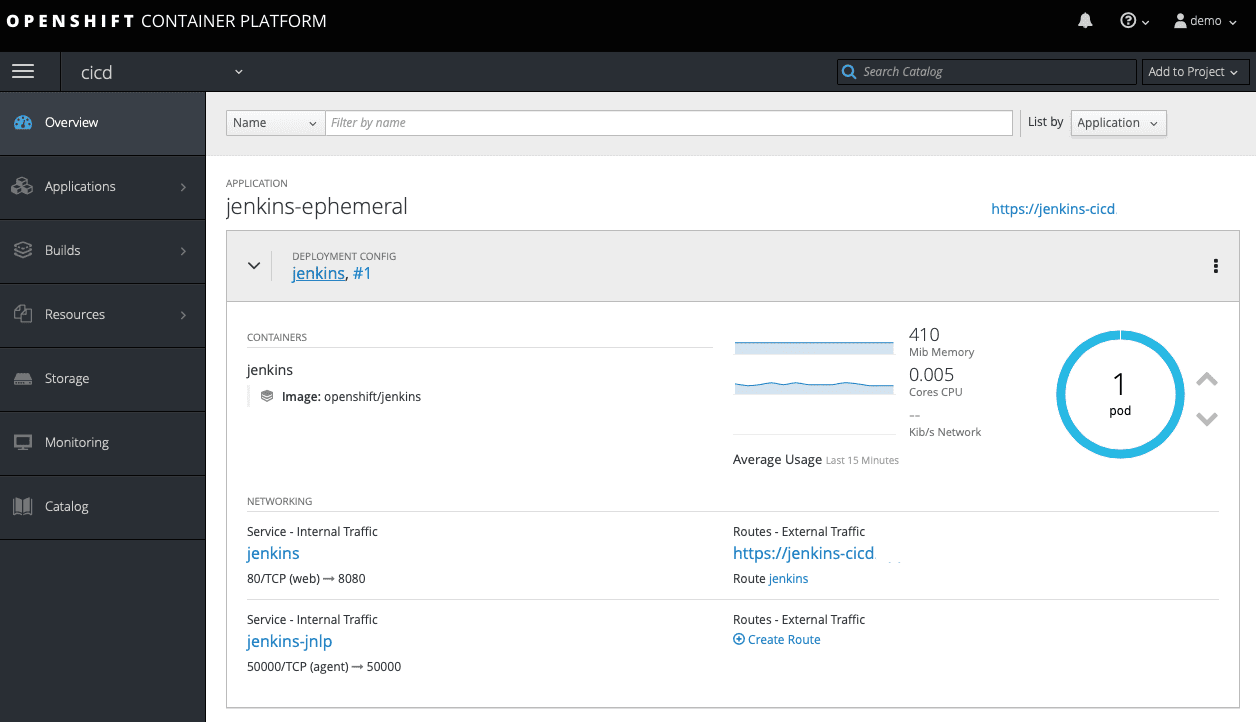
We are now ready to create the pipeline. This will start a Jenkins instance within the project, if it was not already running:
$ oc new-app https://github.com/pjoomen/hellopythonapp.git#pipeline
* A pipeline build using source code from https://github.com/pjoomen/hellopythonapp.git#pipeline will be created
  * Use 'start-build' to trigger a new build

--> Creating resources ...
buildconfig "hellopythonapp" created
--> Success
Build scheduled, use 'oc logs -f bc/hellopythonapp' to track its progress.
Run 'oc status' to view your app.
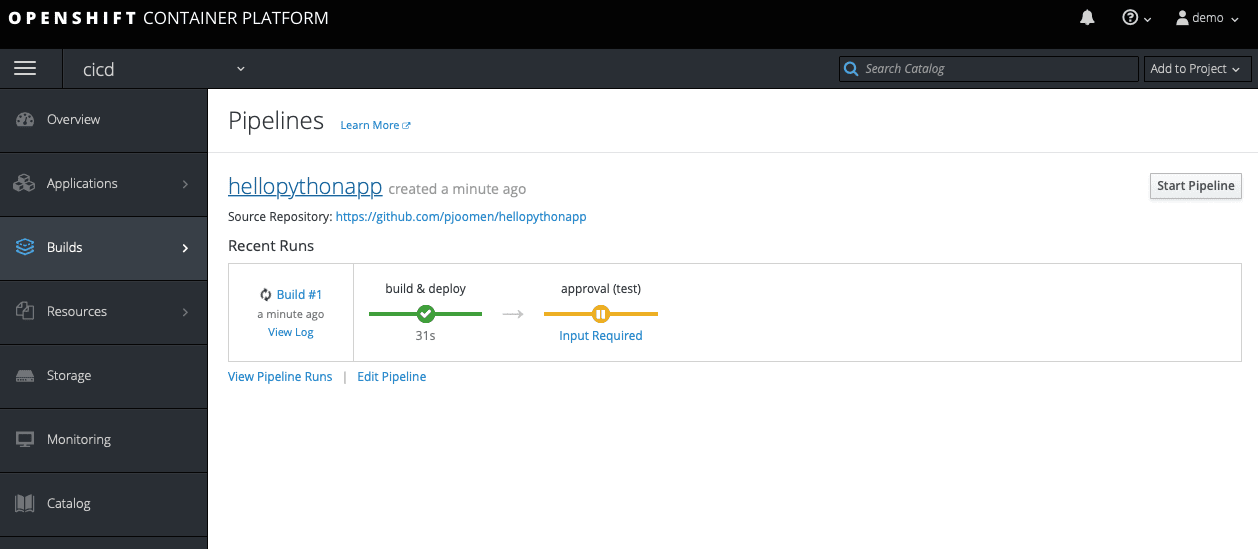
It will take some time while Jenkins initialises. A build will be started as soon as Jenkins is up and running.
$ oc logs bc/hellopythonapp
info: Logs available at https://jenkins-cicd.<openshift_master_default_subdomain>/blue/organizations/jenkins/cicd%2Fcicd-hellopythonapp/detail/cicd-hellopythonapp/1/
Open up the URL mentioned in the log-output to get to the Jenkins/Open Blue Ocean web interface. Here we can approve the deployment to testing, after confirming that the code is functioning properly within the development project.
After the deployment to testing has been performed, verify correct operation of your application within the testing environment and confirm the deployment to production using the Jenkins/Open Blue Ocean web interface.
The end result will be a deployment of you application to all environments:
$ oc status
...
bc/hellopythonapp is a Jenkins Pipeline
  build #1 succeeded 16 seconds ago
...
Starting a new pipeline build
After code-changes have been committed and pushed to the repository, a new pipeline build can be started from within the cicd project:
$ oc -n cicd start-build hellopythonapp
build "hellopythonapp-2" started
Conclusion
Using the presented solution for your DevOps build needs helps making sure that no unintended changes are introduced within your application builds and thereby increases the guarantees of the dev/prod parity requirement from the 12-factor app methodology.
Update
- 2025-09-03: Format