TLDR: Jump to the end for the XML tags we found necessary to get this working.
We have a few projects coming up where we for different and exciting reasons need to use Hyper-V. But running Hyper-V on bare-metal would in this case take up more resources than reasonable for us, so we’re nesting it inside one of our KVM clusters.
But getting Hyper-V 2019 to actually run steadily using nested virtualization inside of qemu-kvm provided some challenges that turned into a long session of trial and error, finding out which tags and features were necessary to get Windows to behave for more than 2 minutes without crashing.
Turning on nested virtualization in KVM
Turning on nested virtualization is fairly straight forward. The following link gives instructions for how-to enable nested virtualization from linux-kvm.org
Enabling Hyper-V on the Windows Guest - or where the trouble started
After a windows guest was installed on the hypervisor, we enabled the Hyper-V feature. Except that didn’t work:
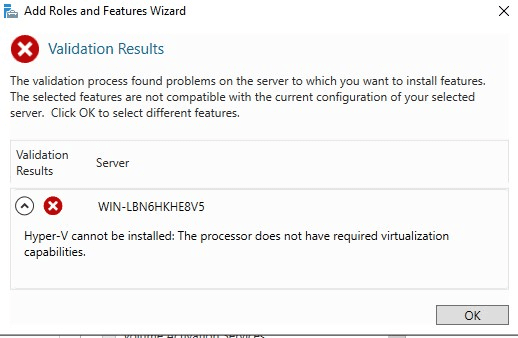
Turns out we hadn’t enabled the VMX tag for the CPU in the libvirt VM configuration file:
<feature policy='require' name='vmx'/>
Then we were able to install the Hyper-V feature, and full speed ahead, we ran into the next problem: Windows just didn’t boot.
After furious googling, I saw that some people had luck with setting specific processor model, rather than having the CPU in passthrough mode.
With a bit of trial and error, I got this working: (again from the VM’s configuration file)
<cpu mode='custom' match='exact' check='partial'>
  <model fallback='allow'>Broadwell</model>
  <feature policy='require' name='vmx'/>
</cpu>
Which was quite annoying, considering the fact that it was a Skylake-Server-IBRS (Intel(R) Xeon(R) Silver 4114 CPU @ 2.20GHz) CPU in the server.
But when we tried something higher than Broadwell, it just didn’t get farther than the windows logo. The loading indicator wheel didn’t even show.
So, the first server got set up with a virtually downgraded CPU, but seemed to be functional.
The second installation
Now that we had one Hyper-V server running nested virtualization inside of KVM, we needed another one for a different purpose on a different hypervisor (cluster).
So, we copied the settings that had worked on the first installation, expecting that to work on the next one as well.
But that server was of a slightly different CPU model Skylake-Server-IBRS (Intel(R) Xeon(R) Gold 6126 CPU @ 2.60GHz) and that was enough to make more trouble.
Because now we got freezes and sometimes BSOD about 2 minutes after booting the Hyper-V server.
 The error message being
 SYNTHETIC WATCHDOG TIMEOUT
More searches on the internet revealed that this could come from a few different places, but usually related to either the <hyperv>, the <cpu> or the <clock> tags in the machine configuration file, or the virtio drivers in the VM.
Time to try everything at once
We made sure the newest virtio drivers were installed and then googled more about what tags we could use to get the VM to behave.
And there were many suggestions, and my first attempt was basically to use them all to see if anything worked. And while doing this search I came across something that others had set as a type of tag in their CPU model: Skylake-Server-noTSX-IBRS.
This is the first configuration where the server didn’t freeze after just a few minutes:
<features>
  <acpi/>
  <apic/>
  <hyperv>
    <relaxed state='on'/>
    <vapic state='on'/>
    <spinlocks state='on'/>
    <vpindex state='on'/>
    <runtime state='on'/>
    <synic state='on'/>
    <stimer state='on'/>
    <reset state='on'/>
    <frequencies state='on'/>
    <tlbflush state='on'/>
    <ipI state='on'/>
  </hyperv>
  <kvm>
    <hidden state='on'/>
  </kvm>
  <vmport state='off'/>
  <ioapic driver='kvm'/>
</features>
<cpu mode='custom' match='exact' check='partial'>
  <model fallback='allow'>Skylake-Server-noTSX-IBRS</model>
  <feature policy='disable' name='hypervisor'/>
  <feature policy='require' name='vmx'/>
</cpu>
<clock offset='utc'>
  <timer name='rtc' tickpolicy='catchup'/>
  <timer name='pit' tickpolicy='delay'/>
  <timer name='hpet' present='no'/>
  <timer name='hypervclock' present='yes'/>
  <timer name='kvmclock' present='yes'/>
</clock>
Finding out which tags were actually required
With a working Hyper-V VM up and running, I could start trying to remove tag by tag to see which tags were actually required, and because of my curiosity, I looked a bit deeper into these tags.
It turned out that there were in this case two things that really mattered:
1. Synthetic Interrupt Controller (SynIC)
<hyperv>
  <synic state='on'/>
</hyperv>
Looking into this gave me some useful information about why this tag could be important.
From the Microsoft Hyper-V documentation:
The hypervisor virtualizes interrupt delivery to virtual processors. This is done through the use of a synthetic interrupt controller (SynIC) which is an extension of a virtualized local APIC; that is, each virtual processor has a local APIC instance with the SynIC extensions.
But also, interestingly a page about all the possible tags you can put into a qemu-kvm xml file: libvirt.org information about format domains
2. noTSX in the CPU model
For some reason the VM refused to get further than the Windows logo when noTSX wasn’t provided in models past Broadwell.
A quick search revealed the following from Wikipedia
Transactional Synchronization Extensions (TSX), also called Transactional Synchronization Extensions New Instructions (TSX-NI), is an extension to the x86 instruction set architecture ( ISA) that adds hardware transactional memory support, speeding up execution of multi-threaded software through lock elision. According to different benchmarks, TSX/TSX-NI can provide around 40% faster applications execution in specific workloads, and 4–5 times more database transactions per second (TPS).
Which means disabling TSX could make the VM’s slower. I would like to benchmark this, but as of right now I don’t have a good way to do that.
The final result
Here’s is what we ended up with for our installation. Since we have two different installations on two slightly different hardware revisions, where one was happy without the <synic state='on'/> tag and one that crashed if it wasn’t there, you might need to try some of the other tags as well if you experience instability
 <features>
    <acpi/>
    <apic/>
    <pae/>
    <hyperv>
      <synic state='on'/>
    </hyperv>
  </features>
  <cpu mode='custom' match='exact' check='partial'>
    <model fallback='allow'>Skylake-Server-noTSX-IBRS</model>
    <feature policy='disable' name='hypervisor'/>
    <feature policy='require' name='vmx'/>
  </cpu>
  <clock offset='utc' />